When do I stop watering my Greenhoods?

This was the question posed to Les Nesbitt at the September monthly meeting.  Later there was some further discussion, of which see below:

When do I stop watering my Greenhoods?

The short answer is when the leaves go yellow and start to die off, usually in October- November. Allow the pot to dry out completely to dry up the roots and old tubers so that they do not go mouldy and rot the new tubers.

Australian terrestrial orchids form tubers underground. The mature plant dies back at the end of the growing season and enters a period of dormancy which for South Australian terrestrials is over summer.

A general principle of watering is to match the watering to the rainfall pattern. Whilst there is minimal rain over summer, when dormant tubers are in pots it is important to not let them stay dry for months and become desiccated. A light sprinkling every week or two is sufficient.

Unicode
Pterostylis ‘Nodding Grace’ This is an hybrid between P. nutans and P. curta. Obviously it is not time to stop watering.

When do I start watering again? 

For the cauline group (Diplodiums) from South-eastern Australia start watering at the end of January as the tubers are starting to shoot by then. For other greenhoods start light watering in late February and gradually increase the water until shoots appear usually in March-April. Do not let the pots dry out once leaves are visible.

Diplodium robustum - one of the cauline greenhoods
Diplodium robustum – one of the cauline greenhoods. Note difference the between the leaves of the non-flowering rosettes and the flowering plants.

Other cultivated Australian terrestrial orchids require a similar watering regime although leaves of some appear later in May or June.

Why use a mulch on your potted terrestrial orchids?

Here in South Australia, it is very common to see a covering of She Oak needles (Allocasuarina sp.) on pots of terrestrial orchids.  According to Les Nesbitt, NOSSA founding member and experienced terrestrial orchid grower, there are four reasons for this

  • It keeps the leaves up off the soil.
    • Provides good air circulation
    • Helps prevent leaf rot.
  • It provides nutrients to the fungi
    • This is very important for the fungi dependent orchids.
  • It stops pitting into the soil when it rains.
    • This is most likely to occur when pots are under the drip line of a shade-cloth.
    • Pitting exposes the root system.
  • It allows the leaves to readily come through because of its small diameters.
    • Other mulches, such as gum leaves, smother seedlings.

She Oak needles are the choice of mulch because it is

  • Long lasting and takes more than year to break down
    • which means that it lasts the whole growing season.
  • Does not become mushy or spongy
    • unlike pine needles and grass cuttings which breakdown more quickly into a wet soggy mass and contribute to leaf rot.

It should be noted that it is necessary to replace this mulch yearly.

These two pots were in the same area under the shadecloth.  Notice the damage to the pot without the mulch.
These two pots were in the same area under the shadecloth. Notice the rain damage to the pot without the mulch.

Advice from the past – Start Watering

In 1984, G.J.Nieuwenhoven was the editor of the NOSSA Journal.  In February of that year he wrote the following:

Welcome back to NOSSA.

 After the holiday break we are all looking forward to the next meeting to talk about our favourite plants and renew friendships.

Several members have reported an early start to the terrestrial season with Pterostylis species, a couple of Diuris species popping up already.  For some of the eastern states Pterostylis of the cauline group this is normal, especially if you keep the pots cool during the summer (a cellar is ideal but underneath a shaded bench in the shadehouse will do nicely). Very light watering should take place when the first shoots appear but do not overdo the watering or place pots in the sun for we are sure to get some more hot weather yet and this could cook your plants before you know it.

The Diuris are really out of season but it was probably the rain in late December and early January that started them off, anyway, these too should be kept slightly damp if they are up.

If you have not finished repotting by now it would be best to leave it until next year as the new shoots which are already beginning to grow from the tubers are very easily broken off while sifting them from the soil.

Apart from that all you can do is wait for the rains to come in March and then start searching for plants to appear – and keep those fingers out of the pots or you may damage one of your best plants looking for the new growths.

This is also the time to start taking notes when plants first appear, etc.:

  • when they flower and how many flowers from a given number of tubers;
  • what kind of soil; what conditions (i.e. shaded or not, damp or dry).
  • Anything that may assist in years to come to help you understand and grow our orchids better and, more importantly, multiply them.
  • A card index system would be a good way to store information, otherwise an exercise book will do.

                                                            Editor

The timing of the article tallies with the advice that was recently given at the end of February – start watering the terrestrials now if you haven’t already begun.  Hopefully by the flowering time you will have a lovely display of terrestrials such as the Thelymitra, Arachnorchis and Caladenia featured below.


Pot of Thelymitra Kay Nesbitt Cultivar copyPot of Arachnorchis argocallaPot of Caladenia latifolia cultivated by Les Nesbitt

Three Key Starting Points for Successfully Growing Australian Orchids

There is a lot of information on growing orchids so much so that it can become overwhelming.  As a novice, I’ve put together my observations which can be summed up in three key points.

One – Find a Mentor

The best and first thing to do is to join a local orchid club, such as the Native Orchid Society of South Australia (NOSSA), and find a mentor within the group.  There are many books but nothing substitutes for that personal interaction with an experienced grower who will know both the plant and the adaptions needed for the local conditions.  At the monthly meetings, NOSSA has a Grower’s forum where various aspects of growing orchids are discussed and questions answered.  It is well worth attending.

Two – Have an Equipment Kit

There are some things that are essential and it is good to have a basic kit to get started.  Later, more equipment can be added as one’s skill develops in growing orchids.  The necessary items would include:

  • Secateurs
  • Labels – these can be proper plant labels from a garden store or wooden lollipop sticks, so long as they are waterproof.
  • Pen – indelible ink pen or pencil (there are pencils that can write on plastic) as it is pointless having a labelled plant with the details washed off.
    • it may be necessary to use both current name and synonyms on the label eg Corybas/Corysanthes
  • Wettable Sulphur – necessary for guarding against diseases and is available from garden centres but Tomato Dust can be a good substitute although it is half the strength.
  • Sterilizing equipment
    • Good nursery hygiene techniques are important
    • Dilute bleach, tri-sodium phosphate (and possibly a small blow torch for metal tools)
    • newspaper
      • a different sheet for each orchid when dividing will help prevent transference of any disease, etc (don’t forget handwashing)
  • For Epiphytes
    • Ties and Stakes
  • For Terrestrials
    • Sieve for recovering tubers
    • Sheoak or pine needles for putting on top of the pots to stop soil and fungi splashing up on the undersize of the leaves
  • Pots – do not need to be fancy but the pot size will depend upon the species
    • Diuris prefer deeper pots; Corysanthes prefer wider, shallower pots whilst Pterostylis doesn’t seem to mind either

Three – Work within the Plant’s Growing Condition

This will require time, research, experiment and going back to the experienced growers.  Each one of us eventually needs to find what is the best setup for our individual location but some general guidelines would be:

  • Start with plants that are suitable for your current climatic conditions.  Obviously putting a tropical Dendrobium bigibbum under the patio in temperate Adelaide is not going to be successful.  For the terrestrials it is better to start with Pterostylis curta or a Microtis than a fungi dependent Arachnorchis tentaculata.
  • Research the plant you want to grow and then create the micro-climate necessary for the flourishing of the plant.  This will entail separating the orchids, don’t put shade lovers such as Corysanthes with those requiring brighter light eg the Thelymitra genus.
Dendrobium speciosum
Potted Epiphyte – Dendrobium speciosum
Thelymitra plants in pots
Potted Terrestrials – Thelymitra (Sun Orchids)

ABC Gardening – Terrestrial Orchids

Back in 2013, Gardening Australia of the ABC produced a video featuring Helen Richards, a Victorian who has in-depth knowledge of growing terrestrial orchids.  Though Helen lives interstate and adaptions do need to be made for different locations and conditions, this video of her shadehouse is very instructive for any South Australian’s wanting to grow their own terrestrials.

Click here to view the video and read the text.

Pot of Thelymitra Kay Nesbitt Cultivar copy
Pot of Thelymitra ‘Kay Nesbitt’ cultivar
Pot of Arachnorchis argocalla
Pot of Caladenia latifolia cultivated by Les Nesbitt
Pot of Caladenia latifolia

October 2014 Winning Photograph

 Caladenia procera

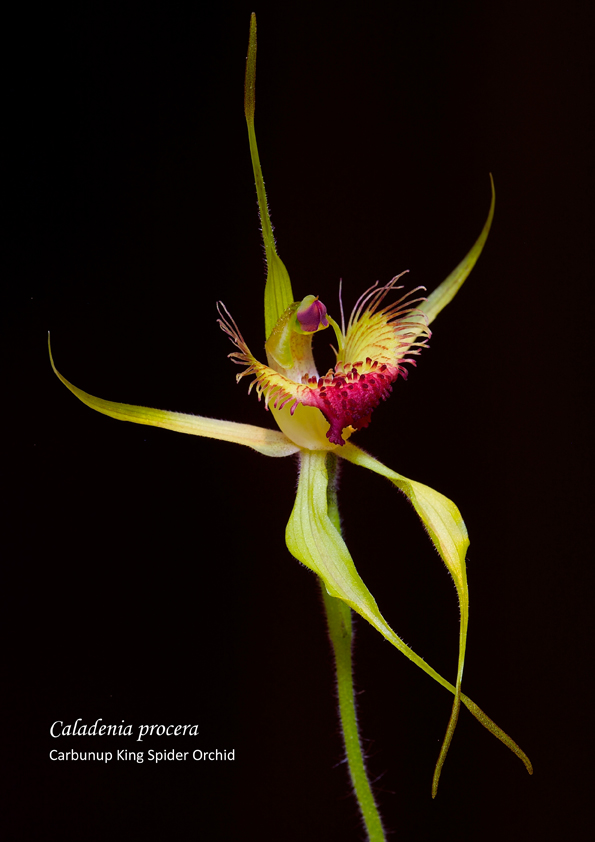
This month’s entries of Oligochaetochilus arenicola, Caladenia flava, Calochilus robertsonii , Diuris palustris and Caladenia procera illustrated the variety of shapes to be found in orchids.

All but one are reasonably common; all but one were photographed in situ and that one was the winning picture by Kris Kopicki – Caladenia procera. Its common name, Carbunup King Spider Orchid, reflects its location near Busselton Western Australia. This species has a severely limited distribution with a small population and is threatened by land clearing for development. Consequently it is rated as critically endangered.

The other aspect of this plant is that it is a photograph of a plant in a pot not the bush. Kris benched the original plant at the September Tuesday meeting when it was still in bud. By Saturday it was in glorious flower.

This picture exemplifies the two objects of NOSSA which “are to promote and engage in activities for the promotion and furtherance of:

  1. the culture, propagation, conservation, knowledge and scientific study of the native orchids of Southern Australia and the Australasian region;
  2. the preservation of orchids as a species and their preservation within their native habitat.”

Some terrestrial orchids are relatively easy to grow but not this one. It takes time patience and skill to grow them. C procera is one of the fungi dependent species and though capable of living many years, it can take up to six years before flowering, although under ideal condition it could mature in as little as two years.

Being able to grow the different terrestrial orchids is one of the ways NOSSA can help in their conservation. NOSSA has a Growers’ Forum each meeting night where members can attend and learn from experienced growers how to grow both epiphytes and, importantly, the terrestrials.

Reference:

Native Orchid Society of South Australia Inc. (NOSSA) Rules of Association 2007

Caladenia procera – Carbunup King Spider, Orchid Species Profile and Threats Database (SPRAT) – http://www.environment.gov.au/cgi-bin/sprat/public/publicspecies.pl?taxon_id=68679 – access 6th November 2014

Remember November’s theme is Orchids and Insects (Spiders and other critters accepted as Honorary Insects)

Bananas Trigger Flowering of Orchids


Some native terrestrial orchids only flower in the season after a bushfire.  They are stimulated by the hot gases given off during the fire.  One of those gases is ethylene.  Bananas are shipped down from Queensland to the southern states of Australia as green bananas to stop fruit fly outbreaks.  On arrival they are put in sealed rooms and exposed to ethylene gas.  The bananas ripen a few days later.  Traces of ethylene remain in the banana skin.  Overripe fruit also emits ethylene gas.  Orchid flowers do not last long if ethylene is present in a closed glasshouse.

We know that dormant tubers exposed to ethylene often flower the next season.  The best example is the Hare orchid Leptoceras menziesii.  In summer I put dormant tubers in a small dish in a plastic bag with a banana skin and seal the bag with a rubber band.  The skin may go mouldy so should not touch the tubers.  I leave the bag inside my shed for about 2 weeks then remove the tubers and pot them up.  The exposed plants make leaves almost twice as large as normal tuber leaves.  This procedure should not be carried out with the same plants the following year as they may get exhausted and die out.  I have found results with other shy flowering species are not so reliable.  Maybe they need a stronger does of ethylene.

Article by Les Nesbit

Banana & Banana PeelVol 38 No 5 June 2014

NOSSA Journal

A Revolution of a Sweet Kind

Ever since the Western world discovered the orchid in the 18th and 19th century there have been enthusiasts wanting to grow them but though an orchid may produce millions of seeds, for they are minuscule, only a relatively small number germinate.  The seeds do not have any stored food and are dependent upon fungi for germination.  This made it difficult for early orchid growers who relied on obtaining specimens from the wild – a most unsustainable practice!

Yet today cultivation of orchids is flourishing.  It is not dependent upon removing specimens from the bush.  In Australia it is illegal.

Today the orchid enthusiast can grow orchids from seeds at home.  The technique, invitro embryo germination, is popularly known as flasking.  It involves growing the seeds in a sterile agar medium to which the most significant ingredient was the addition of sugar.

At the time it was developed by Professor Lewis Knudson (1884 – 1958) of Cornell University in 1922 this method was revolutionary.


Reference:

Rasmussen J, April – June 1986, “Contact Dermatitis from Orchids” Clinics in Dermatology Volume 4 Number 2

Below are some examples of terrestrial orchids grown from seeds in flasks.

Flasking Terrestrial Orchid Seeds (3)  Flasking Terrestrial Orchid Seeds (2)  Flasking Terrestrial Orchid Seeds (1)

Photographs kindly supplied by Les Nesbitt.


South Australian Terrestrial Orchid Culture Notes Part Four of Four Parts

Re-establishing Orchids

Replanting in bushland should be restricted to orchid species that grow or once grew in the local area. No hybrids please.

If planting out in the garden or bush, choose a location with good air movement and winter sun and a thin layer of surface mulch. Slashed native ground cover is good. Native terrestrial orchids cannot stand competition from weeds, grasses, slugs and snails and scratching blackbirds (all introduced pests). They will rot away in dense weeds or dense understory plants. If in a frost prone area they may need overhead protection from a shrub or trees. For plants in growth, dig out a hole a little bigger than the tube. Knock out the tube and insert the contents into the hole and backfill with as little disturbance as possible. Dormant tubers can be planted in a furrow, 50mm or more deep, and backfilled just like planting beans. Water in. The colony forming species will spread out and form patches of plants over a period of several years.

Orchid seed is like fine dust and can be mixed with fine dry sand to help spread it over a large area. Broadcast using a pepper-shaker over a suitable site. Results are dependent on the season and whether fungi are present. This method is slow to show results as flowers may not be seen for 5 to 10 years after seed is sown. More seedlings germinate if there are mother plants already growing.

Pot of Arachnorchis argocalla

A pot of Arachnorchis argocalla, 40 cm tall (Fungi Dependent)

To learn more about re-establishing orchids in the bush, visit the Vale Park Our Patch website to see the work being done by Heather Whiting and her team.

South Australian Terrestrial Orchid Culture Notes Part Three of Four Parts

Maintenance throughout the year

Summer

  • During summer, very lightly water surface of pots weekly to prevent tuber desiccation especially if dormant seedlings are in the pot.
  • Divide overcrowded pots in summer. Tip out and break into slices like cutting a cake. Stand a slice in a new pot & fill spaces with fresh mix. Take care to keep the surface layer at the surface of the new pot.
  • Add fresh leaf litter to surface layer in January to February to March.
  • If surface moss gets too thick, peel it off and discard in summer.

Autumn

  • Start heavier watering of pots weekly from mid March.
  • Mix seed with fine dry sand and sprinkle on mother pots in April.
  • Water as required in autumn, winter & spring so that pots never dry out during the growing season yet are not soggy wet.
  • Leaves appear from Anzac Day to June.

Winter

  • Look for flower buds down inside the largest leaves from mid July onwards.
  • Look for new seedling leaves from August to October.

Spring

  • Enjoy and photograph flowers September to November.
  • Hand-pollinate flowers in September – October. Flowers collapse within days of fertilisation.
  • Collect seed pods as they turn brown just before they split open in November – December.
  • Dry & store seed over summer in paper envelopes kept indoors.
  • Allow pots to slowly dry out in mid – late November to induce dormancy and ripen tubers. Plants die down completely in summer to underground tubers.

For further information on growing fungus – dependent orchids refer to:

  • Orchids Australia’ February 2006, P58, or ‘The Orchadian’ Vol 15, Number 3, March 2006, P100.

Pot of Caladenia latifolia cultivated by Les Nesbitt

Caladenia latifolia cultivated by LN (Fast Multipler)