With Spring on the way, things are starting to change in the Orchid House. Here are Les Nesbitt’ notes from the August Journal 2019 Vol 43 No 7
Terrestrial Culture – August
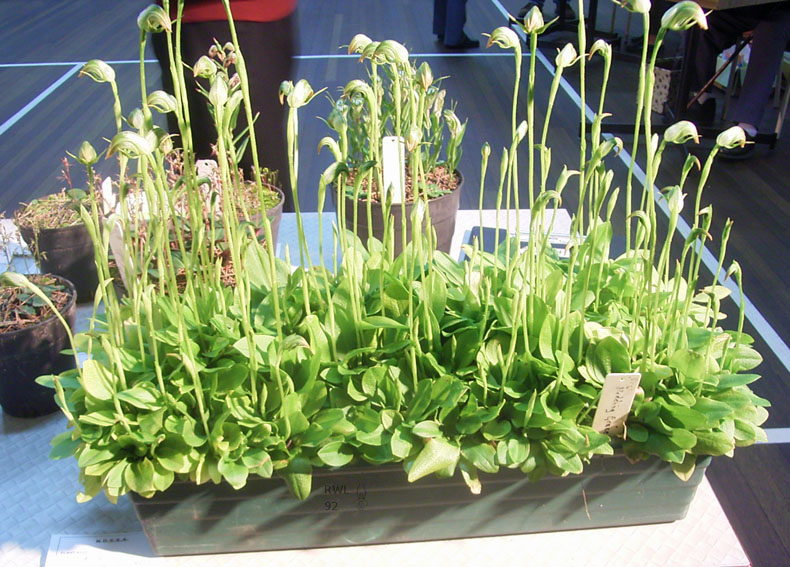
The days are getting longer now, noticeably so after the middle of the month. When the clouds clear, the sun is stronger & higher in the sky. Temperatures increase and growth speeds up. Lots of buds are developing so there is plenty to see in the orchid house. The greenhoods are a feature with Pterostylis curta, nutans, pedunculata and their hybrids are all flowering.
Pests become more active. Look out for aphids on flower stems. Depending on the season deflasking can start after the middle of the month if a sunny and dry Spring is forecast, otherwise wait until September.
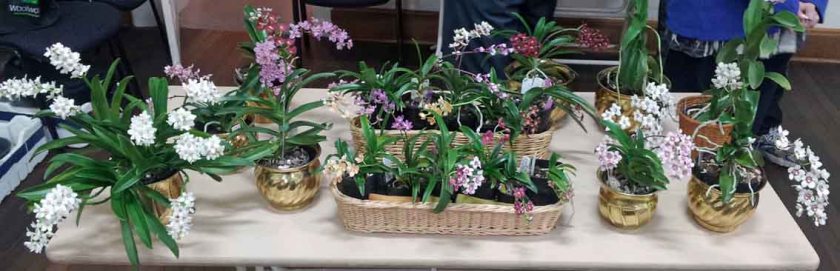
The NOSSA Spring show is only a month away. Start preparing your specimen pots for the display. Any spare pots can be sold on the trading table. There are never enough terrestrials on the trading table at the show to meet the demand.
Photograph your orchids when the flowers are at peak condition. Then hand pollinate a flower or two to get seed for the NOSSA Propagation Workshop or for sowing around mother plants next autumn. Prepare two pots of each species, one for showing and one for seed.
How to hand pollinate.
Look closely at the flower column to see the positions of the pollen and the stigmatic surface. Flowers can be self-pollinated if there is only one. Fatter pods with more viable seeds result if two plants of the same species are cross pollinated. That is transfer the pollen from one flower to a flower on another plant. Cross pollination mixes the gene pool to prevent inbreeding. Use a toothpick or a she-oak needle to touch the pollen which will stick to the wood. Wipe the pollen across the stigmatic surface of the other flower and the job is done.
If pollination is successful, the flower will collapse in a few days and the ovary will start to swell. For greenhoods the stigmatic surface is halfway up the front of the column. Remove the front of the flower and the lip so you can see what you are doing. Greenhoods have yellow pollen. For Diuris and Thelymitra the white pollen is hidden behind the sticky stigma. Caladenia have yellow pollen under flaps at the top of the column. Stroke upwards to open the flaps as would an insect backing out of the flower. The stigma is a hollow sticky depression just below the pollen. You will have to tip the flower right back to see it.
The following article is from Volume 42 Number 10 November 2018 Native Orchid of South Australia Journal. Marg Paech, editor, has written an excellent summary based upon Kevin Western’s detailed notes which he has kindly supplied and is available here.
Kevin Western, this month’s guest speaker didn’t hold back. He exposed some of the myths pedaled by good growers who misinform naive newbies or other growers.
Until about 1960 or thereabouts, the only Sarcochilus orchids that existed were in the bush where they had evolved and grown for all time and the only orchids that existed in people’s collection were bush collected so therefore all were species. No doubt, at times in the bush, there were hybrids made accidentally by pollinators or by other natural chance events. 1968 was the first time we can say for sure that there were hybrid Sarcochilus in existence.
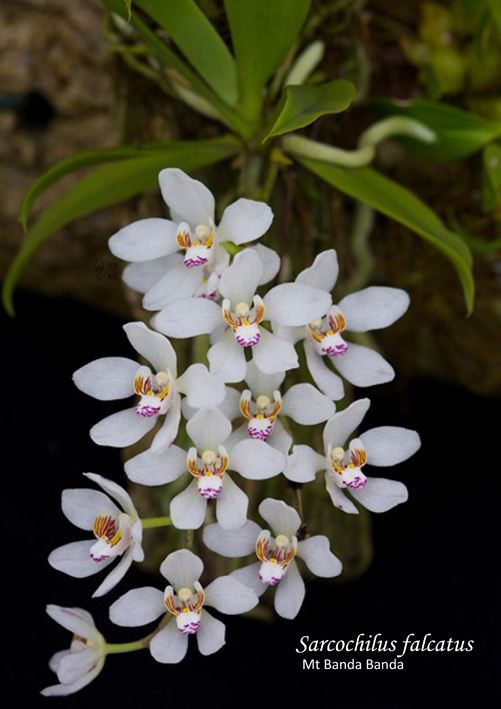
Sarcochilus are native to the east coast of Australian and to Tasmania. There are about 25 species recognized and the number has grown recently with the splitting off of S. minutoflos.
The easiest species to grow for hobbyists generally are Sarcochilus hartmannii and S. fitzgeraldii. From their physical appearance and flowering time, flower shape and nature, it can be seen that they are closely related. Their natural environment can be matched in a pot by using a range of different potting materials (either solely or a mixture of) – suitable size pine bark, Perlite, cut up tree fern fibre, rice hulls and or sphagnum moss. Remember, they will grow on rocks, rubble or on various types of natural and artificial mounts!
Sarcochilus falcatus
Humidity
Sarcochilus grow naturally where they do because of the balance between the suitable amount of reliable moisture in the form of rainfall and or dew; and those unavoidable moisture losses due to sun, heat and wind. We can replicate that by just giving our Sarcochilus regular waterings, and ensuring that our potting medium is coarse enough. An extra layer of shade in really hot summers can help, and by reducing wind movement by the location and provision of shade houses, we can create suitable growing conditions for our orchids. Frequent watering is the trick – retirees by hand watering and workers by sprinklers, misters on timers or thermostats or similar. Air movement is a must but here in sunny Adelaide we get plenty of it and in fact, too much movement has a drying effect.
Potting Mixes
The best mix for Cymbidium (sic)* orchids is a coarse, non-retentive medium – far better because they can be watered frequently – even twice a day or far more, and plants do far better. Even standing the pots in water during summer works wonders! Trial and error is the best way to learn, as experienced by Kevin.
Sarcochilus can be potted into clay balls used by hydroponics growers. Good, clean coarse pine bark also is fine.
Watering and Fertiliser
It is generally considered impossible to grow plants on mounts in shade houses etc in suburban Adelaide. Yet another myth! They grow exceptionally well, a fact that Kevin found out thanks to Kris Kopiki. It is more difficult to overwater a plant on a mount.
There are lots of myths about fertilizing. Using far more dilute fertilizer applied to a dryish mix and roots, Kevin has found to be far more effective. His policy is to fertilise weakly and frequently. Despite the hundreds of fertiliser options and brands available – they all are only better or worse
sources of those few essential substances which an orchid requires. The seaweed extract products are probably good as they seem to promote root growth. Keep it simple is the best option.
Summary
Our Sarcochilus have roots designed to grow attached to rocks or branches or twigs and are designed to catch and hold quite small water opportunities and they may benefit from drying out from time to time and for periods of time.
Coarser and less water retentive media are advantageous by enabling the roots to experience some drying as would occur in nature.
We are then able to water and fertilise far more often and our plants will grow better. We need to better understand what our preferred fertiliser’s strengths and weaknesses are so that we can better supply their needs more simply, more effectively and at lower cost.
Regular watering, wind control and shade improvement to avoid drying stress is far more sensible than hoping to reproduce and sustain high humidity.
Thank you Kevin for such a candid, down-to-earth talk full of good advice for growers
*In Kevin’s note he discusses his experience with Cymbidiums but Sarcochilus can also be grown with a similar medium.
Steve Howard’s October Australian Epiphytes and Terrestrials Orchids Cultural Notes for Adelaide’s conditions.
Epiphytes
October sees many native epiphytes finish flowering and shortly it will be the best time for potting on and division as new growths are due shortly. The earlier you start, the more time the orchid has a chance to initiate new growth and mature it in time for next years flowering.
Remove spent flowers as leaving them on the plant in wet and humid conditions leads to rot caused by botryitis.
Be aware that aphids are in big numbers now and will cause grief to flowers and new growths.
Malathion at 1 ml/ litre of water will knock them out.
Repeat fortnightly for 6 weeks to break the breeding cycle.
Apply lime to plants grown in bark to counteract acidity.
Terrestrials
Most terrestrials nearing completion of the season.
Start drying off once leaves start yellowing. Keep water up to those staying green.
Additional shade helps now as suns intensity increases
Steve Howard’s September Australian Epiphytes and Terrestrials Orchids Cultural Notes for Adelaide’s conditions.
Watering
Epiphytes
Mounts daily. Generally moistening roots only.
Pots weekly. Small pots twice weekly depending on weather.
Terrestrial
Pots can dry out faster on warmer days so keep a watch on conditions. Note some terrestrials will commence summer dormancy towards the end of the month. Those that do show signs can have water reduced somewhat.
Feeding
Terrestrials
Weak organics like Seasol and Powerfeed applied in low doses can benefit colony type greenhoods.
Epiphytes
Low nitrogen always best for native epiphytes. Top up epiphyte pots with dolomite lime and a dash of blood and bone. Seasol a useful additive now as new seasons root start.
Pests and Disease
Epiphytes
Botrytis will rot new buds in cold damp weather as fast as it attacks new growths from now. Aphids will increase sharply this month and favour new growth and spikes. Pyrethrum sprays eco friendly and work well, so does a hose but dry spike straight after.
Terrestrials
Some terrestrials will rot this month if conditions have been too wet or stagnant over winter. Note this for next season and add more drainage if this has been an issue.
General Advice
Keep flowering plants under cover to enjoy as can be rather wet and cold as well sunny and warm this month. Start repotting and division once flowering finished to give plants longest possible time to establish over new growing season.
Time to get busy and take note of the jobs of potting and division to be done. Sept and October are the best months to work on the collection before the hot weather sets in.
Do you have small slugs and snails in your pots? Get a cheap coffee grinder and grind up your snail pellets. Sprinkle in the pot and water them in. Bite size for micro slugs and the baits get right into where they hide.
[Terrestrials are not repotted until summer – Steve will have more on that later]
Though Melbourne and Adelaide conditions are very different, in cultivation the watering is similar with the warning that in Adelaide it is a harsher environment for this genus.
The following information has been kindly supplied by Richard Thomson, an experienced terrestrial grower from ANOS Victoria.
Chiloglottis valida
Generally, Chiloglottis are kept damper than Pterostylis, during the dormant period. As many Chiloglottis need the potting media and the tubers dampening in summer, the general action with water, is to have the tubers damp until leaves emerge. Then to commence normal pot watering.
Chiloglottis, can get infected with rust. The first thing usually noticed is some pairs of leaves sticking up in the air. When you look closely you will notice some whitish little lumps on the underside of the leaf. Please immediately take the pot away from your other orchids as it is contagious across Chiloglottis. There does not seem to be an effective way to treat the infection.
ANOS VICTORIA MEETINGS
CHILOGLOTTIS
Species
State / Location
Month Benched
BUSH FLOWERING
WATERING
chlorantha
NSW
July Aug Sept
Sept to Oct
Keep damper from early February. Water when leaves emerge
cornuta
S NSW Vic Tas SA
Nov Dec
Nov to Feb – altitude
Keep damp all year. Water when shoots emerge.
diphylla
Qld NSW
Feb Mar Apr May Jun Jul Aug
Feb to May
mid to late January
sp affin diphylla
Feb
Keep damper from early February. Water when leaves emerge
formicifera
NSW
Jul Aug Sept Oct Nov
Aug to Nov
keep damper from early February, Water when leaves emerge
sp affin formicifera
Jul
Keep damper from early February. Water when leaves emerge
gammata
Tas high
Oct to Feb
jeanesii
Vic
Nov Dec
Nov to Jan
Keep damp all year. Water when shoots emerge.
longiclavata
N Qld
Feb Mar Apr May Jun Jul Aug
April to June
mid to late January
palachila
N NSW
Aug Sept Oct Nov
Nov to Feb
keep damper from early February, Water when leaves emerge
x pescottiana
NSW ACT Vic
Jun Jul Aug Sept Oct
Aug to Nov
keep damper from early February, Water when leaves emerge
platypetala
Sept
Keep damper from early February. Water when leaves emerge
platyptera
N NSW
Jul Aug Sept Oct
July to Oct
keep damper from early February, Water when leaves emerge
reflexa
NSW Vic Tas
Feb Mar Apr
Dec to May
mid January
sp affin reflexa
Feb
mid January
seminuda
S NSW
Feb Mar Apr May
Jan to April
keep damp all year
spyrnoides
S Qld N NSW
Feb Apr Dec
Dec to April
Keep damp all year. Water when shoots emerge.
sp affin spyrnoides
Feb Oct Nov Dec
Dec to Feb
Keep damp all year. Water when shoots emerge.
sylvestris
Qld NSW
Feb Mar Apr May Jun Jul Aug
Dec to May
early to mid January
trapiziformis
Qld to Tas
Jul Aug Sept Oct Nov
Aug to Nov
keep damper from early February, Water when leaves emerge
triceretops
Tas
Oct
Aug to Dec
Keep damp all year. Water when shoots emerge.
trilabra
NSW ACT Vic
Feb May Dec
Dec to March
late December or earlier
trullata
Qld
Jul Aug Sept Oct
Winter
keep damper from early February, Water when leaves emerge
truncata
S Qld
Jun Jul Aug Sept Oct
July to Sept
Early to mid February
sp affin truncata
Jul Aug Sept
Autumn
Keep damper from early February. Water when leaves emerge
vallida
NSW ACT Vic
Sept Oct Nov
Sept to Jan – altitude
Keep damp all year. Water when shoots emerge.
(As there is no January meeting, there is no information on flowering in cultivation for this month.)
From the chart, it can be seen that the cultivated flowering time does not always match the bush flowering time.
This week we continue with both Part Two and Part Three of Brendan Killen’s Rescuing Apparently ‘Dead’ Orchids which appeared in the Volume 31 No 9 October 2007 and Volume 31 Bi 11 December 2007, respectively.
Rescuing apparently ‘dead’ orchids. Part 2 By Brendan Killen
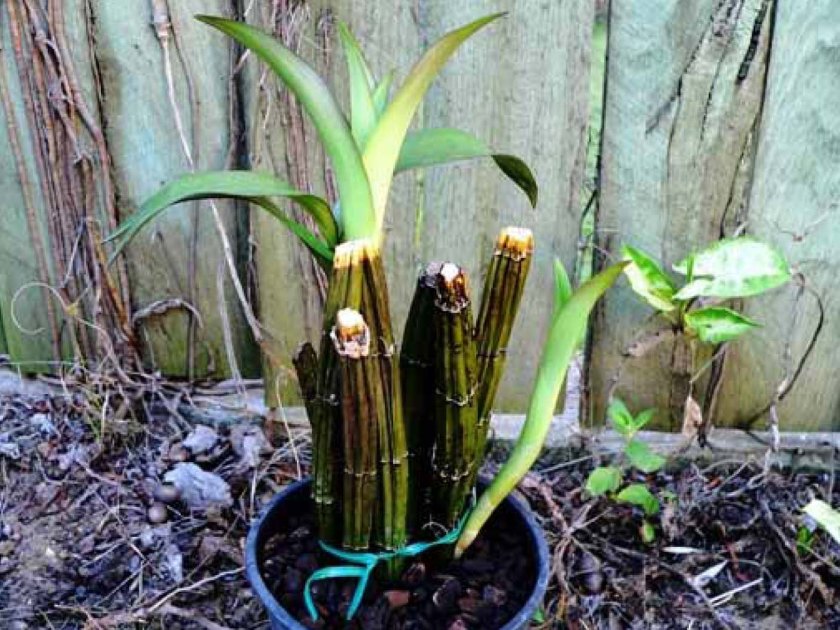
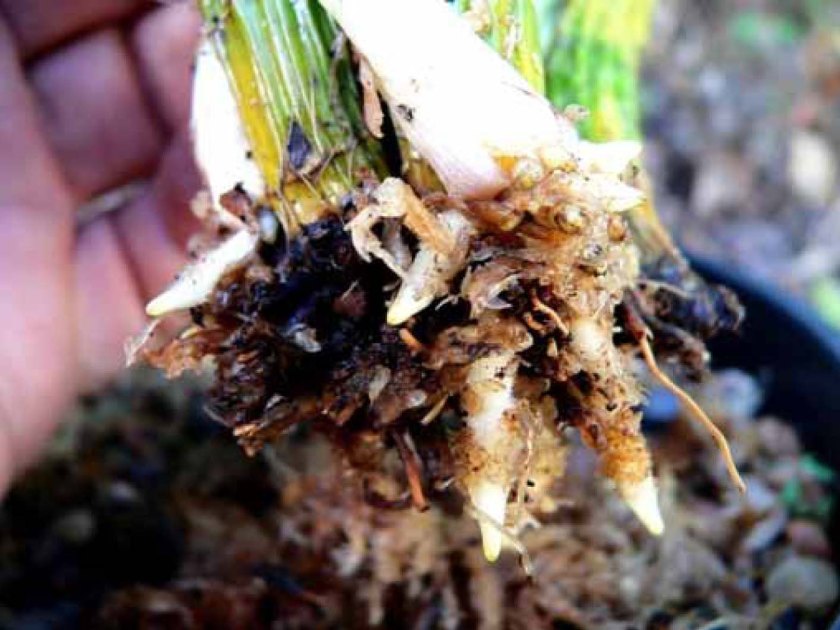
PLANT #2 – Dendrobium Alick Dockrill “Pale Face”
The cane pieces of this plant were inserted into a bark mix at the same time as the canes of Den. Jayden ‘JANE’ [See the July Journal] were inserted into sphagnum moss. The outcome is three healthy growths.
Note the dried ends of the canes where they were cut into separate pieces. As you can see from the photograph, I used a green twisty to hold the canes in the bark as a fairly solid bunch – I find this is the best way to keep the canes still whilst they are developing sensitive new growths. I have found that no matter how bunched-up the canes are, the new growths always find a way to the surface.
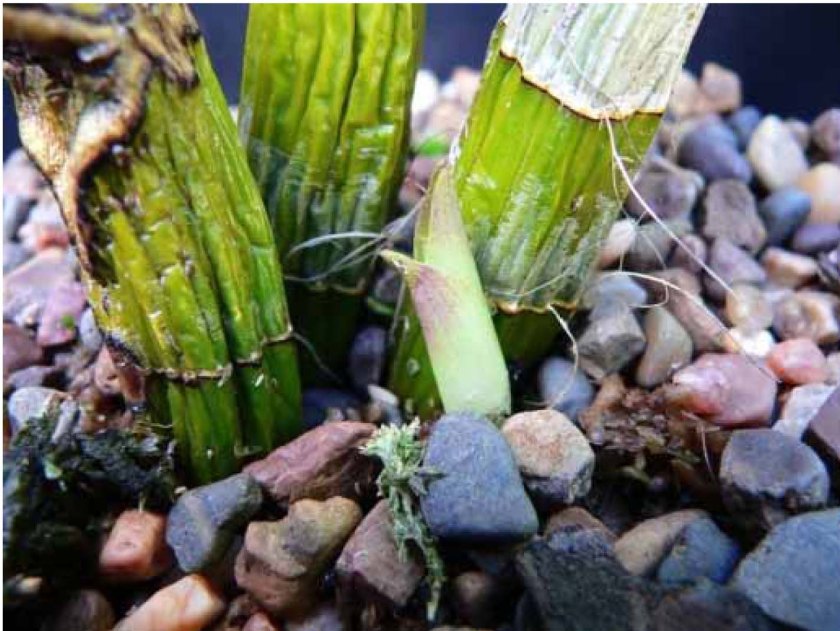
Here is a different angle on the new growths with my fingers providing some perspective on the size of the growths.
Note that they are significantly larger that those on the Den Jayden ‘JANE’, with the same time in the pots.
I do not consider this evidence of the worth of bark compared to sphagnum moss.
I find that different hybrids and species behave quite differently in terms of their speed and timing of production of new growths. I believe that it is a function of what species are in the background of these plants and the time of year the rescue is undertaken.
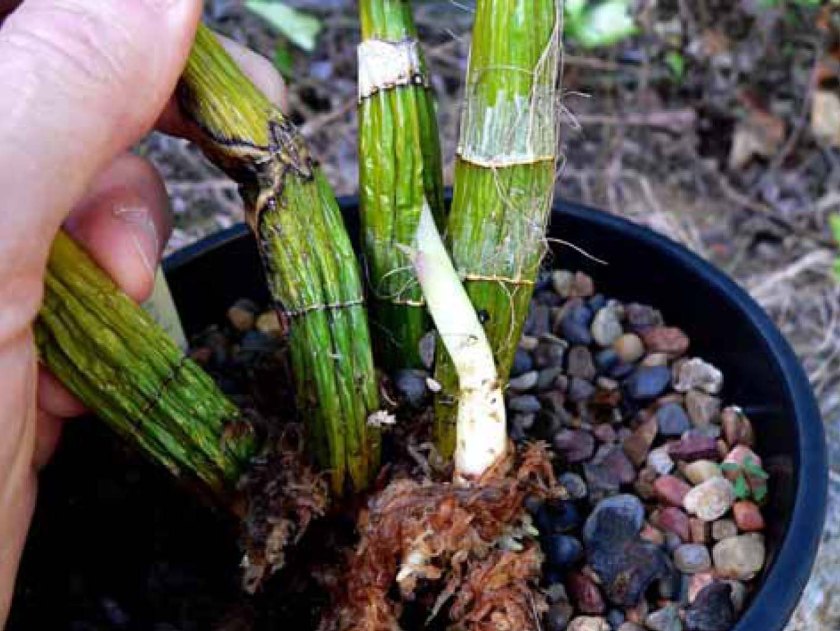
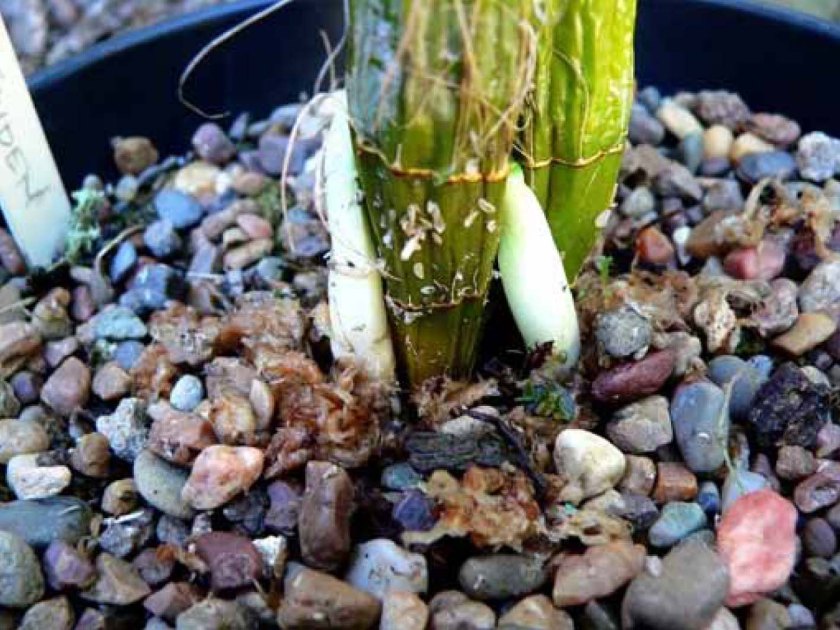
Here is the same plant 5 weeks later. The new roots are protruding from the pot and the new growths are extending themselves – all of this at a time where severe water restrictions limit me to two waterings each week by watering can!
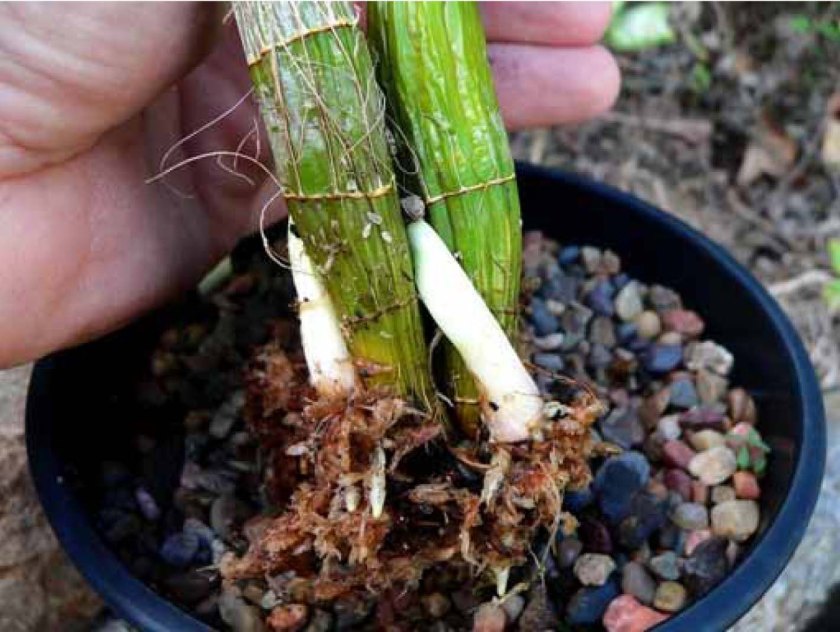
A further 4 weeks of cultivation and bright, warm weather has fully extended and hardened the new growths.
The larger growth should produce a flower spike this Spring.
This is a plant that the late John Purvis gave me just before he passed away. Because it is a special plant to me, I cut an old cane into three pieces to produce a back-up plant, just in case my piece of the original fell foul of the orchid gremlins.
As you can see, it is the least developed of the three plants featured in this article. And yet, the parent plant has produced two magnificent new growths in the same period. I feel that the 12.5% of Den. bigibbum and 12.5% of the hot growing Den. tetragonum var. giganteum have influenced this. This new growth has probably been encouraged since the relocation from Adelaide to Brisbane where the temperature differences overnight are more subtle than in the Adelaide Hills where the plants were previously cultivated. The two hot growing species in the plant’s background were probably held back by Adelaide’s much cooler overnight temperatures. Anyway, this is purely conjecture on my behalf. What is important is that I now have a developing back-up plant for one that I treasure dearly.
Dendrobium Sarah Jane ‘Purvis’ (Photographer Josh Bridge)
SUMMARY
The thrust of what I have written is simple – don’t give up on treasured plants that look like they have expired, because there is always hope so long as the canes haven’t turned into fermented mush! The technique is as simple as cutting canes into lengths where you have at least three, preferably four, segments from which new growths will materialise. Use sterilized cutting tools to avoid contamination of the canes. Once the new growths have emerged, give them time to produce healthy root systems and let the new canes harden before potting-on. The best time I have found to pot-on the new growths is early autumn.
****************
Thank you to Josh Bridge for supplying images of the flowers of Dendrobium Alick Dockrill “Pale Face” and Dendrobium Sarah Jane ‘Purvis’ as they were not in the original articles.
***************
Another technique demonstrated by John Gay at one of the NOSSA meetings a couple of years ago was to take the apparently dead canes of an epiphytic orchid and seal them in a plastic bag with a small piece of damp sponge (or other cloth) and leave them in the shadehouse. Do not let the sponge dry out. So long as there was a bit of moisture, there was a chance for new growth on the shrivelled canes. Once the growth was obvious, pot on as normal.
The following is part of a three part series on reviving apparently dead epiphytic orchids from Volume 31 No6 July 2007
Rescuing Apparently ‘dead’ Orchids
By Brendan Killen
In late Spring 2006, I had an ‘open shade house’ event at my place in Belair, South Australia. As part of the programme, I demonstrated how I rescue orchids that have all but died. My demonstration was based on many years of experience in not giving in to the demons that cause orchids to expire.
I used two orchids that everyone attending agreed would normally be tossed into the rubbish bin or compost – all bare canes; heavily shrivelled; all new growth ‘eyes’ at the base of the canes chewed out by insects. In other words, an apparently hopeless situation. I’ve never given up on these terminal plants, believing that they still had life in the old canes along as they hadn’t turned to fermented mush.
I also used an apparently ‘dead’ cane from a treasured orchid that I was hoping would eventually produce a back-up plant using the method I describe in the following text.
In one case (Dendrobium Jayden), I cut the canes into a number of segments and stuck them into a pot with heavily compressed sphagnum moss, topped with river gravel to suppress the moss from growing and overtaking the pot. In the other two cases (Den. Alick Dockrill & Den. Sarah Jane), I cut the canes into segments and placed them in a pot of small composted bark.
The following photographs were taken about 3 months after the repotting demonstration and after the plants were relocated to Brisbane. They demonstrate the benefit of the right technique and a ‘don’t give up’ attitude. This technique has not failed me yet, allowing me to rescue many prized plants that have gone on to be show-bench winners.
PLANT #1 – Dendrobium Jayden “Jane”.
This photo illustrates the emerging new growth on a Den. Jayden “Jane”. This is the first evidence that success is at hand. It is also the first new growth discovered on this plant before I inspect the canes further to see if there are any other new growths buried within the sphagnum moss.
In this photo, you can see that the new growth is very pale from having emerged from deep in the sphagnum moss with little exposure to light. The juvenile roots can be seen emerging on the right hand side.
A closer inspection reveals another growth, on the other side. Note that both growths are not coming from the ‘eyes’ at the bottom of the canes – simply because they were cut off at potting time. They are emerging from the section that joins the cane segments.
Teasing away the sphagnum moss reveals even more of the young roots. Note how the new growths are lacking any colour substance at this stage.
If I were to ignore this plant for much longer, the new growths would have rotted in the very moist sphagnum moss, neutralising my efforts. So, the lesson here is to ensure that you monitor the plants for new growths and ensure that you elevate the new growths above the sphagnum moss to give them a chance to ‘harden off’ from their immersion deeper in the sphagnum.
This photo illustrates how I have re-seated the canes within the sphagnum moss, but much higher so that only the roots are exposed to the heavy moisture content of the moss. I choose to do this instead of placing them straight into a bark mix as I find that the plants tend to go into a shock at the relative lack of moisture in bark and can die quickly, or suffer from stunted growth. I wait until the new growths have matured with substantial green substance before I repot them in a bark mix. And, I tend to do this in late autumn when they are not under any temperature or light stress. By spring, they will be racing ahead in the bark mix with new root growth and, possibly new canes and/or flower spikes.
One Month Later……….
After one month from the re-seating described previously, note that the pale new growth is now mature and bright green. And, note how the roots are emerging from the growth above the sphagnum moss. This plant will be ready for potting-on into a bark medium in the next few weeks as autumn cools the air in Brisbane.
Epiphytic orchids grow on trees or rocks (lithophytic), where they are dependent on their host for support but not for food.
CULTIVATION
The majority of Australian epiphytic orchids can be easily grown in cultivation. Most can be grown in Adelaide if the correct cultural requirements are provided. These include controlled glasshouse conditions, shadehouse conditions and, in some instances, in the garden. Only a few species are able to tolerate the cold winter months in Adelaide without extra protection, and all need protection from frost.
CONTAINERS AND MOUNTS
Plants can be grown in pots or mounted on an appropriate substrate. Pots may be either plastic or terracotta. Terracotta pots are porous and dry out more quickly than plastic. If terracotta pots are used, their drainage holes may need to be enlarged to give very good drainage. Plants should be potted into the smallest pot, which comfortably accommodates the base of the plant.
Plants may be mounted on materials such as compressed or natural cork slabs, branches of rough barked trees, black weathered tree fern slabs and pieces of weathered hardwood. Brown tree fern slabs contain substances, which are toxic to orchid roots and are not suitable. Those species that have a pendulous habit e.g. Dendrobium teretifolium should only be mounted.
POTTING MIX
Most potted orchids require a mixture made up of bark chips (fir or pine), to which may be added charcoal, gravel or polystyrene chips, in which to grow. Bark used should be aged and preferably purchased as graded hammer-milled bark, not shredded bark. Fresh pine bark contains compounds, which are toxic to orchids. Before use fresh pine bark should be soaked in water changed regularly, to remove toxins. This may take 3 weeks. If in doubt as to the freshness of the bark, treat as above to be sure.
Depending on the size of your plant, bark may vary from 5-7mm up to 20mm in diameter, and sieved if necessary to remove fine particles and dust. Other substances such as scoria, leaf mould and coarse grit may also be added according to the requirements of the particular species involved. Whatever the substrate, be it a slab or potting mix, the essential thing with all epiphytic orchids is to always provide good drainage for the plant’s root system. This ensures no, or minimal, root rot of plants.
Repotting is necessary when the potting mix breaks down resulting in poor drainage, the medium goes stale or when the plant over grows its container. The best time to repot is during the spring, after flowering, when the plant starts to actively grow again. Try to repot every 2-3 years.
Potting on: If the plant has overgrown its container and the mix has not deteriorated, it can be potted on into the next sized pot with minimal disturbance to the root system.
GROWING ENVIRONS, HOUSING
Garden Culture
Several species may be grown outside in Adelaide, provided they are given a position sheltered from frosts and hot drying winds. They should receive daily supplementary watering during the summer. They may be tied on to trees with rough non-deciduous bark or grown on rocks. Microclimates can be created in areas of the garden using screens for protection and other plants to help maintain a humid atmosphere.
Bush house, Shadehouse
These structures are built to give protection from frosts, strong winds and sun and to provide extra humidity for plants. They may be covered with shadecloth or tea-tree and should have a solid south wall. They provide protection, but still allow for good air circulation around the plants. A water impervious roof, e.g. fibreglass or polycarbonate sheets, will protect plants and flowers from excess water in the winter.
Unheated glasshouse
An unheated glasshouse gives more protection to the plants, achieving higher temperatures during winter days, and better humidity. It may be made from glass or other materials such as fibreglass or polycarbonate sheets. Additional shading with shadecloth or paint is necessary from October to March-April. Adequate ventilation must be provided, by using ventilators under the benches to let in fresh air, and roof ventilators to let out hot air. Alternatively, air circulation can be achieved using fans. All orchids love fresh air.
WATERING
All plants need to be watered frequently from October to April, during the growing period. Most species require watering once a day or twice a day if the weather is particularly hot or drying. Ensure that plants dry out between waterings. During winter, watering once a week should be sufficient for plants in a glass house environment, although plants which are mounted may be misted (a very fine spray) more frequently. Water early in the morning of winter days to ensure that the leaves of the plants have dried off by night. Water lodging in leaf axils in cold, comparatively still conditions, renders that area liable to fungal attack. Humidity may be maintained by watering the floor and under the benches, particularly in summer.
Rainwater, if available, is preferable to mains water, which can. In some cases, increase in salinity to a level, which is harmful to good plant growth.
FERTILISING
To promote healthy growth of all epiphytic orchids, a supplement of half strength liquid fertiliser every two weeks may be used during the growing season of the plant, i.e. November to April. Mature potted plants can be sparingly fertilised with slow release pellets. Too much fertiliser will lead to a salt build up (especially in charcoal), which will harm the plants.
PESTS
Pests will become a problem in any shadehouse or glasshouse if the grower does not keep a watchful eye out for them. The shadehouse or glasshouse should be kept free from weeds, decaying organic matter and rubbish, as these are the places where pests feed and accumulate. Overcrowding of plants will also encourage pests to thrive.
Pests can be easily removed by squashing if they are in small enough numbers. A pest strip hung in the glasshouse successfully controls many pests. Unfortunately the environment of a glasshouse, which suits orchid culture, also provides a suitable environment for the spread of pests. Poisonous chemical sprays should only be used after non-toxic preparations have been unsuccessfully used. These chemicals also destroy the natural predators of insect pests, upsetting the natural balance.
Caution should be used when handling chemical sprays as many are very toxic to the user as well as the pests. The manufacturer’s directions and warning labels should be read carefully and recommended strength adhered to strictly.
DISEASES
Australian epiphytic orchids are generally disease free. Fungal infections may occur, susceptible areas being new growths, especially in young plants. These can be kept to a minimum by maintaining good air movement and avoiding water remaining in leaf axils for too long. Broad spectrum fungicides are suitable to control severe infections.
PLANT CARE
Removal of any dead leaves, pseudobulbs, etc, not only enhances the aesthetics of the plants, but also lessens the chance of further deterioration. These areas are also the places where pests may accumulate or diseases harbour.
This was the question posed to Les Nesbitt at the September monthly meeting. Later there was some further discussion, of which see below:
When do I stop watering my Greenhoods?
The short answer is when the leaves go yellow and start to die off, usually in October- November. Allow the pot to dry out completely to dry up the roots and old tubers so that they do not go mouldy and rot the new tubers.
Australian terrestrial orchids form tubers underground. The mature plant dies back at the end of the growing season and enters a period of dormancy which for South Australian terrestrials is over summer.
A general principle of watering is to match the watering to the rainfall pattern. Whilst there is minimal rain over summer, when dormant tubers are in pots it is important to not let them stay dry for months and become desiccated. A light sprinkling every week or two is sufficient.
Pterostylis ‘Nodding Grace’ This is an hybrid between P. nutans and P. curta. Obviously it is not time to stop watering.
When do I start watering again?
For the cauline group (Diplodiums) from South-eastern Australia start watering at the end of January as the tubers are starting to shoot by then. For other greenhoods start light watering in late February and gradually increase the water until shoots appear usually in March-April. Do not let the pots dry out once leaves are visible.
Diplodium robustum – one of the cauline greenhoods. Note difference the between the leaves of the non-flowering rosettes and the flowering plants.
Other cultivated Australian terrestrial orchids require a similar watering regime although leaves of some appear later in May or June.