The first competition for the year followed a wet orchid theme with three of the orchids being South Australian swamp orchids and the fourth from Western Australia; though not a swamp dweller, it grows in shallow moist soil.
The outstanding winner was Claire Chesson’s Cryptostylis subulata, followed by Robert Lawrence’s Spiranthes alticola, Rosalie Lawrence’s Pterostylis falcata and Pauline Meyer’s Thelymitra villosa.
Known to South Australian’s as the Moose Orchid, elsewhere it is either Large Tongue Orchid or Cow Orchid. This tall (40 to 110 cms) evergreen orchid is common in the eastern states where it is commonly found in damp areas as well as swamps. but in South Australia it is limited to swamps and is rated as endangered.
Whilst not an easy orchid to grow it has been cultivated although seed set has not always occurred. Helen Richards, an experienced Victorian terrestrial orchid grower, shared in an email how she grows them.
“Cryptostylis species grow from brittle rhizomes which can be quite long and they resent frequent disturbance. Mine are potted into a pot therefore that is large enough for the long roots and which will accommodate further growth for several years. My mix is ANOS basic mix, the same as I use for Pterostylis and many other genera. They need to be kept moist all year round, especially in summer when they flower and new leaves appear, their active growing period. I grow them in an area of moderate light. Others have seen pollinators active on the flowers but I haven’t. However seed capsules frequently develop without my assistance with a toothpick. Richard Thomson says they haven’t had success germinating the seed.”
I have recently been learning about propagating orchid via flasks but I have mould in some of the flasks.
Flask with orchid seeds and mould
There is mould in the flask with orchid seeds and also in the flask with Diuris tricolour in bulbs. The bulbs are almost ready for deflasking.
Flask of Diuris tricolour (no mould) – these will be deflasked later this year.
What can I do?
Answer:
With a home laboratory, no matter how careful one is, mould can still contaminate the jars of agar. If mould occurs when the orchids are still in seed, then the whole jar needs to be discarded. The seeds will not survive.
With the Diuris flask, as they are almost ready for deflasking, pot them out straight away. This needs to be done within 10 days of the mould appearing. The weather (March, 2017, South Australia) is still a little too warm but if left in the flask, the plants will die. Potting them out may give them a chance of survival.
When deflasking, it is important to rinse all the agar off the bulbs before potting on as normal. Once potted, it could help to cover the pot with a cut down clear drink bottle with the lid removed. This will allow some air to circulate. Keep the pot in a shady spot.
Potted Diuris tricolour with protecting bottle cover
Will it survive in the pot? Hopefully it might but at least the plants have a better chance of survival then if left in the flask where it would surely die.
Though Melbourne and Adelaide conditions are very different, in cultivation the watering is similar with the warning that in Adelaide it is a harsher environment for this genus.
The following information has been kindly supplied by Richard Thomson, an experienced terrestrial grower from ANOS Victoria.
Chiloglottis valida
Generally, Chiloglottis are kept damper than Pterostylis, during the dormant period. As many Chiloglottis need the potting media and the tubers dampening in summer, the general action with water, is to have the tubers damp until leaves emerge. Then to commence normal pot watering.
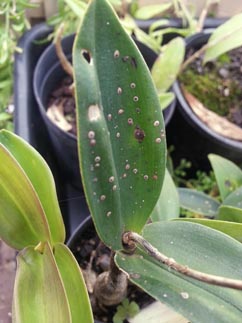
Chiloglottis, can get infected with rust. The first thing usually noticed is some pairs of leaves sticking up in the air. When you look closely you will notice some whitish little lumps on the underside of the leaf. Please immediately take the pot away from your other orchids as it is contagious across Chiloglottis. There does not seem to be an effective way to treat the infection.
ANOS VICTORIA MEETINGS
CHILOGLOTTIS
Species
State / Location
Month Benched
BUSH FLOWERING
WATERING
chlorantha
NSW
July Aug Sept
Sept to Oct
Keep damper from early February. Water when leaves emerge
cornuta
S NSW Vic Tas SA
Nov Dec
Nov to Feb – altitude
Keep damp all year. Water when shoots emerge.
diphylla
Qld NSW
Feb Mar Apr May Jun Jul Aug
Feb to May
mid to late January
sp affin diphylla
Feb
Keep damper from early February. Water when leaves emerge
formicifera
NSW
Jul Aug Sept Oct Nov
Aug to Nov
keep damper from early February, Water when leaves emerge
sp affin formicifera
Jul
Keep damper from early February. Water when leaves emerge
gammata
Tas high
Oct to Feb
jeanesii
Vic
Nov Dec
Nov to Jan
Keep damp all year. Water when shoots emerge.
longiclavata
N Qld
Feb Mar Apr May Jun Jul Aug
April to June
mid to late January
palachila
N NSW
Aug Sept Oct Nov
Nov to Feb
keep damper from early February, Water when leaves emerge
x pescottiana
NSW ACT Vic
Jun Jul Aug Sept Oct
Aug to Nov
keep damper from early February, Water when leaves emerge
platypetala
Sept
Keep damper from early February. Water when leaves emerge
platyptera
N NSW
Jul Aug Sept Oct
July to Oct
keep damper from early February, Water when leaves emerge
reflexa
NSW Vic Tas
Feb Mar Apr
Dec to May
mid January
sp affin reflexa
Feb
mid January
seminuda
S NSW
Feb Mar Apr May
Jan to April
keep damp all year
spyrnoides
S Qld N NSW
Feb Apr Dec
Dec to April
Keep damp all year. Water when shoots emerge.
sp affin spyrnoides
Feb Oct Nov Dec
Dec to Feb
Keep damp all year. Water when shoots emerge.
sylvestris
Qld NSW
Feb Mar Apr May Jun Jul Aug
Dec to May
early to mid January
trapiziformis
Qld to Tas
Jul Aug Sept Oct Nov
Aug to Nov
keep damper from early February, Water when leaves emerge
triceretops
Tas
Oct
Aug to Dec
Keep damp all year. Water when shoots emerge.
trilabra
NSW ACT Vic
Feb May Dec
Dec to March
late December or earlier
trullata
Qld
Jul Aug Sept Oct
Winter
keep damper from early February, Water when leaves emerge
truncata
S Qld
Jun Jul Aug Sept Oct
July to Sept
Early to mid February
sp affin truncata
Jul Aug Sept
Autumn
Keep damper from early February. Water when leaves emerge
vallida
NSW ACT Vic
Sept Oct Nov
Sept to Jan – altitude
Keep damp all year. Water when shoots emerge.
(As there is no January meeting, there is no information on flowering in cultivation for this month.)
From the chart, it can be seen that the cultivated flowering time does not always match the bush flowering time.
There is a lot of information on the web about treating scale, some relevant to a specific country, some accurate, some not and much that is contradictory.
The following information is based upon treatment methods that the Native Orchid Society of South Australia (NOSSA) growers have found most effective.
WHAT IS SCALE?
Scale are tiny sap sucking insects of which there are several species in Australia. The female adults build a shield-like cover for protection. The shields are often brown but can be white or red. The shield can be up to 3mm in size. Once a shield is built the adult does not move about but stays in the one position. Ants farm scale as they exude a honeydew sap, a food source for the ants.
Immature scale or crawlers do move about. These can be a different colour from the adult eg juvenile brown scale can be yellow, other species can have grey juveniles. They are lightweight no more than 1mm and easily windborne.
The life cycle is short, and for many species, within a month there is a new generation of scale. Scale multiply rapidly.
Scale tend to attack epiphytic orchids. Evergreen terrestrial orchids may be affected but not the deciduous ones.
EFFECTS OF NOT TREATING SCALE:
Apart from making the plants look ugly, scale left unchecked can
infect other plants
weaken the plant leading to death of the plant
make the plant worthless for shows
develop secondary infection of sooty mould
treating the scale will treat the mould
Left untreated the new growth will eventually become infected
Quarantine and treat new plants before introducing them to the orchid collection
newly acquired plant can be a major source of scale infestation
for thoroughness, use both a contact and systemic spray (see below Types of Sprays)
Preventive spraying
schedule spraying 2 – 4 times a year
Consider relocating ferns if they are under orchid benches as this can often be a host for brown scale.
Control ants
If free-standing bench or hanging pots are free of scale and plants are not touching any other surface than applying Vaseline around each of the feet/lower part of the hooks will prevent ants and crawlers from moving into the area.
Vaseline is waterproof and so will be effective for a long time.
SCALE PREDATORS:
Biological control alone appears to be ineffective but the following is a list of known predators
Crypotlaemus montrouzieri Native ladybird feed on mealybugs and felt scale
Mallada signata, Green Lace Wings, feed on aphids, spider mites, various scales, mealybugs, moth eggs and small caterpillars
Chilocorus beetles
Aphystis wasp species
TREATMENT:
Scale are hard to eliminate entirely. Vigilance and persistence are important factors in controlling scale.
Treatment works either by
a direct contact spray whereby the insect is suffocated by smothering. This is effective for all stages of the life cycle but particularly for the adult under its shield.
an application of a systemic chemical.
or a combination of both.
For treatment to be effective the leaves (both upper and underside), crevices, sheaths, pseudobulbs, stems must be thoroughly drenched with the spray of choice.
Types of Sprays
Contact Sprays
Whatever type of contact spray used, treat every 2 weeks for three treatments
Soapy Water (for those who like using home-made remedies)
Using pure soap (not detergent), suds up a bar in a bowl of water, and pour into a spray bottle.
This is the last of the three terrestrial fact sheets in Culture Notes that NOSSA has produced on growing terrestrial orchids. All three facts sheets can be downloaded – Click on the following for Fungi Dependent, Slow Multipliers and Fast Multipliers.
Arachnorchis tentaculata, common name King Spider Orchid or Large Green Comb Spider Orchid
Some 3/4 of Southern Australian terrestrial orchids are fungus dependent throughout their life cycle. Orchids that are fungus dependent have very specific cultural requirements. The fungus must be grown in the pot with the orchid. Sometimes a third entity such as a shrub or tree is involved in the fungal relationship.
A minimum disturbance culture is used.
Limited numbers are available each year. Other fungus dependent species are rarely available. Those in cultivation have mostly come from rescue digs in the past. NOSSA has started a seed kit project to help overcome this vacuum.
GROWTH HABIT: Australian ground orchids follow an annual growth cycle comprising 6 – 8 months as growing plants under cool (5 – 20°C max, 0 – 14°C min) moist conditions and 4 – 6 months as dormant tubers in hot dry (18 – 42°C max, 12 – 30°C min) conditions. The new tuber is produced in winter – spring. Each tuber sends up a shoot to the surface in Autumn and leaves grow rapidly in late Autumn/early Winter as temperatures fall and the rains set in. Sometime in October/November the leaves go yellow and then brown and dry as the days get longer, hotter and drier in late Spring.
LIGHT/SHADE: In Adelaide they thrive in a shadehouse of 50% shadecloth. Some species prefer heavy shade, others full sunlight, but most will adapt to a wide range of light intensity.
If the leaves and stems are weak and limp or if the leaf rosettes are drawn up to the light then the shading is too dense and the amount of light should be increased. FDs are mostly spring flowering and like higher light intensities at flowering time. flowers may have pale colours if placed in heavy shade, even temporarily, when buds are just starting to open.
In very cold areas an unheated glasshouse may be required for frost protection although light frosts do not worry the majority of species.
AIR MOVEMENT/HUMIDITY: All species like good air movement and will not thrive in a stuffy humid atmosphere especially if temperatures are high.
POLLINATION/SEED COLLECTION: FDs seldom multiply so must be propagated from seed.
Flowers on the strongest plants of the same species growing in pots are cross pollenated by hand to set seed pods. The flowers collapse in a day of so and pods ripen in 4-8 weeks. Pods are collected as they change colour from green to brown, which happens quickly on a hot day in October/November. Tea bags can be tied over the pods to catch the dust like seed if frequent visits to site are not possible.
Pods are stored dry in paper envelopes indoors over summer. Seed can be sprinkled on mother pots or scattered on bush sites.
SEEDLING CARE: Seedlings can be raised by sowing seed around potted mother plants.
At Easter time, just before the rainy season begins, the dust-like seed is mixed with fine sand in a pepper shaker (minimizes seed loss) and sprinkled on top of the pots and watered in. Germination occurs in Autumn/Winter as that is when the fungi are most active. Tiny leaves appear from July to October. The seedlings form miniscule tubers on droppers about 1 – 2cm below the surface. Seedlings take up to five years to reach flowering and are best left undisturbed until larger.
WATERING: The soil should be kept moist at all times during active growth by watering gently if there is no rain. Hand watering is especially necessary in spring as soil in pots dries out more rapidly than in the garden. Watering must be done slowly so that the mat of needles on the surface of the pot is not disturbed. Slugs and snails love these plants and must be kept under control. Raising the pots off the ground on galvanised steel benching is very effective in controlling these pests.
After the leaves have turned yellow, let the pot dry out completely to dry up the old roots and tubers otherwise they may turn into a soggy mouldy mess and rot may destroy the adjacent new tubers.
REPOTTING: The plants are not repotted but left in the same pot year after year.
SUMMER CARE: Keep the pots shaded and allow the pots to dry out between light waterings until mid-February when they should be set out in their growing positions and watered a little more often. The tubers of some species will rot if kept wet during the dormant period, others will produce plants prematurely which are then attacked by pests such as thrip and red spider and fungal diseases in the warm weather.
A thin layer of new leaf litter is placed on top of the existing leaf litter each summer to feed the fungus. Chopped gum leaves or sheoak needles are suitable.
The second fact sheet in Terrestrial Culture notes is about Slow Multiplying Terrestrials.
FLAGBEARER SPECIES: Thelymitra nuda
Diuris, Pterostylis and Thelymitra. They are more expensive because they have to be raised from seed in flasks. SMs are not so easy because there is less room for error. A few have a near zero increase rate and will fade away unless additional plants can be produced to make up for occasional losses from predators and disease.
GROWTH HABIT: Australian ground orchids follow an annual growth cycle comprising 6 – 8 months as growing plants under cool (5 – 20°C max, 0 – 14°C min) moist conditions and 4 – 6 months as dormant tubers in hot dry (18 – 42°C max, 12 – 30°C min) conditions. The new tuber is produced in winter – spring. Each tuber sends up a shoot to the surface in Autumn and leaves grow rapidly in late Autumn/early Winter as temperatures fall and the rains set in. Pterostylis leaves are usually the first to appear in March/April followed by Diuris and Thelymitra in April/May. Sometime in October/November the leaves go yellow and then brown and dry as the days get longer, hotter and drier in late Spring.
LIGHT/SHADE:Australian terrestrial orchids are easy to grow. In Adelaide they thrive in a shadehouse of 50% shadecloth. Some species prefer heavy shade, others full sunlight, but most will adapt to a wide range of light intensity. Sun loving species (Diuris, Thelymitra & Rufa group Pterostylis) prefer a brighter location for good growth.
If the leaves and stems are weak and limp or if the leaf rosettes are drawn up to the light then the shading is too dense and the amount of light should be increased. The spring flowering species like higher light intensities at flowering time and flowers may have pale colours if placed in heavy shade, even temporarily, when flowers are just starting to open.
In very cold areas an unheated glasshouse may be required for frost protection although light frosts do not worry the majority of species.
AIR MOVEMENT/HUMIDITY:All species like good air movement and will not thrive in a stuffy humid atmosphere especially if temperatures are high.
WATERING:The soil should be kept moist at all times during active growth by watering gently if there is no rain. Hand watering is especially necessary in spring as soil in pots dries out more rapidly than in the garden. Watering must be done slowly so that the mat of needles on the surface of the pot is not disturbed. Slugs and snails love these plants and must be kept under control. Raising the pots off the ground on galvanised steel benching is very effective in controlling these pests.
After the leaves have turned yellow, let the pot dry out completely to dry up the old roots and tubers otherwise they may turn into a soggy mouldy mess and rot may destroy the adjacent new tubers.
POLLINATION/SEEDCOLLECTING:Flowering plants are hand pollinated and the seed collected just before the pods split open and the dust-like seed blows away. The seed is sprinkled on pots of mother plants at Easter or flasked.
REPOTTING:Repot every second year in half new mix. Repotting is normally done between November and January. The best results are obtained if the tubers are repotted in half fresh soil mix each second year. A suitable soil mix is 40% loam, 50% sand and 10% organic matter with a little blood and bone fertiliser added. A 5 mm sieve is a useful tool for separating tubers from soil. Replant the dormant tubers with the tops 20 mm deep. Cover the soil surface with a mulch of sheoak needles, chopped to 20 – 50 mm lengths, to prevent soil erosion & aerate under the leaves.
INCREASING PLANT NUMBERS:The pull-off-the-tuber method can be used with some diuris and Pterostylis species to double plant numbers annually. The pots can be knocked out and the tubers examined in Summer without harm.
SUMMER CARE: Keep the pots shaded and allow the pots to dry out between light waterings until mid-February when they should be set out in their growing positions and watered a little more often. The tubers of some species will rot if kept wet during the dormant period, others will produce plants prematurely which are then attacked by pests such as thrip and red spider and fungal diseases in the warm weather.
FERTILIZING:SMs will benefit from weak applications of folia feed in the early growth stages.
Recently, NOSSA updated the Terrestrial Culture Fact Sheet. Instead of one sheet, it was decided to split it into three – Culture of Fast Multiplying Terrestrials, Culture of Slow Multiplying Terrestrials and Culture of Fungi Dependent Terrestrials. Though much of the growing information is similar, there are some significant differences of which growers need to be aware. The first of the fact sheets is Culture of Fast Multiplying Terrestrials.
FLAGBEARER SPECIES: Pterostylis curta
Pterostylis curta (Blunt Greenhood) is rated rare in South Australia. Ex situ conservation is another dimension to conservation.
Others include Chilogolottis, Corybas, Cyrtostylis, Diplodium, Microtis most Pterostylis and some Diuris. Most FMs are Autumn or Winter flowering. The exceptions are Diuris and Microtis. FM are the most common terrestrial orchids to be seen at meetings and shows. Once seedlings are established they are no longer fungi dependent.
GROWTH HABIT:FMs are the easiest terrestrial’s orchids to grow. They multiply by forming 2 – 5 tubers per plant each year. The annual growth cycle comprises 6 – 8 months as growing plants under cool (5 – 20⁰ C max, 0 – 14⁰ C min) moist conditions and 4 – 6 months as dormant tubers in hot (18 – 42⁰ C max, 12 – 30⁰ C min) dry conditions. New tubers are produced in winter/spring. FMs are colony types, ie they multiply annually and will spread out over time if planted in the ground. Each tuber sends up a shoot to the surface in autumn and leaves grow rapidly in late autumn/early winter as temperatures fall and the rains set in. FMs mainly flower in Autumn and Winter. Diplodium & Pterostylis leaves are usually the first to appear in March followed by Diuris and Microtis in April, and Corybas in June to July. In October/November the leaves go yellow, then brown and dry as the days get longer, hotter and drier in late spring.
LIGHT/SHADE: In Adelaide, they thrive in a shadehouse of 50% shadecloth. Some species prefer heavy shade, others full sunlight but most will adapt to a wide range of light intensity. Sun loving species (Diuris & Microtis) prefer a brighter location for good growth. Corybas like the shadiest corner. If the leaves and stems are weak and limp or if the leaf rosettes are drawn up to the light, then the shading is too dense and amount of light should be increased.
In very cold areas an unheated glasshouse may be required for frost protection although light frosts do not worry the majority of species.
AIR MOVEMENT/HUMIDITY: All species like good air movement and will not thrive in a stuffy humid atmosphere especially if temperatures are high.
WATERING: The soil should be kept moist at all times during active growth by watering gently if there is no rain. Hand watering is especially necessary in spring as soil in pots dries out more rapidly than in the garden. Watering must be done slowly so that the matt of needles on the surface of the pot is not disturbed. Slugs and snails love these plants and must be kept under control. Raising the pots off the ground on galvanised steel benching is very effective in controlling these pests.
After the leaves have turned yellow, let the pot dry out completely to dry up the old roots and tubers otherwise they may turn into a soggy mouldy mess and rot may destroy the adjacent new tubers.
REPOTTING: They grow better if repotted annually otherwise the plants crowd together around the rim of the pot. Repotting is normally done between November and January. The pots can be knocked out and the tubers examined without harm. For best results repot the tubers in half fresh soil mix. A suitable soil mix is 40% loam, 50% sand and 10% organic matter with a little blood and bone fertilizer added. (They will also grow in native potting mix.) A 5 mm sieve is a useful tool for separating tubers from soil. Replant the dormant tubers with the tops 20 mm deep. Cover the soil surface with a mulch of chopped sheoak needles (20 – 50 mm lengths). This prevents soil erosion and assists with aeration under the leaves.
SUMMER CARE: Keep the pots shaded and allow the pots to dry out between light waterings until mid-February when they should be set out in their growing positions and watered a little more often. The tubers of some species will rot if kept wet during the dormant period, others will produce plants prematurely which are then attacked by pests such as thrip and red spider mite and fungal diseases in the warm weather.
FERTILIZING: FMs are very hardy and will benefit from weak applications of folia feed in the early growth stages.
The best size pots to use for terrestrial orchids should be between a minimum of 125mm (5 inches) to a maximum of 175 mm (7 inches). Black plastic pots are better than terracotta as they last longer and are easy to sterilize.
If the pots are too small, they dry out too quickly in Autumn and Spring.
If they are too large, it gets too wet for the tubers. If using a larger pot, then the drainage needs adjusting by adding coarser sand to the mix. Specimen pots for show purposes utilize pot sizes up to 300mm holding 30-50 plants. Clay pans are sometimes used for show work.
The pots should not be shallow. 125mm depth is the minimum recommended for reliable results. For instance, the Arachnorchis like deeper pots as the tubers tend to go down deep. Droppers have been known to come out of the bottom drainage holes. When this happens to stop the tubers shrivelling up in summer, it will be necessary to stand the pot on the sandy soil of another pot.
Used pots can be cleaned by blasting off loose grime with a high pressure jet of water and then soaking in a bucket of water & White King (bleach).
Caladenia latifolia – show specimen in larger size pot
This article is reprinted from Volume 39 No 11 December 2015 Native Orchid Society of South Australia Inc. Journal
Tuber Repotting Time is here
Les Nesbitt
Now that Australian terrestrial orchids have gone into dormancy it is time to think about repotting and preparing for the next growing season.
The best months for this activity are December and January.
I will limit this discussion to the easily grown colony forming terrestrial orchids as these are more likely to be available – for easily grown terrestrials, click here.
IMPORTANCE AND NECESSITY OF GROWING SOUTH AUSTRALIAN ORCHIDS
We need more terrestrial growers in NOSSA to feed the tuber bank and to supply spare pots for sale to the public at the Spring Show. I found it embarrassing to see so few terrestrials for sale at the 2015 Spring Show compared to the numbers available in years gone by.
Growing terrestrials is a rewarding hobby that does not take up much time or space and will pay for itself. Plus you are doing something effective orchids and the environment even if only the most common terrestrials are grown (eg the greenhoods and onion orchids). Consider easily grown, fast multiplying, Pterostylis curta (listed as rare in the SA Act) has been widely grown in NOSSA collections since the days Roy Hargreave’s wash trough when NOSSA was formed.
Once the basic principles are understood it to move onto the rarer species as artificially propagated plants become available in future as they surely will. Members can draw on the tuber bank in December to get started seriously about it as a group of volunteers will be needed within a year or two to help look after the output of a number of projects already underway or about to start.
Year 8 girls at Kildare College have been repotting the school’s terrestrial collection and this is how they did it.
EQUIPMENT
Prepare all the materials needed including:
Pots
crocking material,
sand
organic matter
blood & bone, native compost, chopped up sheoak needles
4B pencil and labels.
PREPARATION
Water the pots lightly a day or two before repotting. The mix should be damp enough to not be dusty, yet dry enough to not stick to everything.
Remove the label, wash it in a container of water and stand it aside to dry.
Check on the label back to see how many tubers were planted last year.
REPOTTING
Scrape off and dump the top layer of soil as this can be contaminated with moss, slimy bacteria and liverworts.
Tap out the plug of soil into a sieve sitting on a bowl. Pick out any tubers that are visible on the outside of the plug.
Gently break the soil apart and search for tubers while squashing the lumps of mix through the sieve.
Very small tubers may go through especially with Corybas. If you have not got a sieve do this operation on a sheet of newspaper.
Place the tubers in a dish so they do not roll away.
Count the new tubers to see whether they increased by 2, 3 or 4 times.
Discard anything left in the sieve (old tubers, roots etc.).
Work out how many new pots are needed to plant all the new tubers.
Add to the old mix in the bowl
a pinch of blood & bone,
a handful of sand and a handful of native potting mix.
Also add enough of these ingredients for each additional pot and mix the contents of the bowl together.
Select new or sterilised 125 mm standard pots
and place a square of shadecloth in the bottom to keep the sand in and critters out.
Pour in mix to within 30 mm of the top and ram down with your fist.
Place up to 10 tubers on top of the mix.
Lay tubers horizontally if unsure which is the top.
Labelling and finishing the task
Write out the orchid name on extra labels and fill in the numbers of tubers on the back for each pot.
Almost fill the pot with mix and tamp down.
Insert the label. Place a layer of cut sheoak needles on top of the mix.
Water the pots and the job is done.
For show pots use 175 mm or larger pots and plant 20 to 50 of the largest tubers available.
If the tubers have decreased or look unhealthy, throw out all the old mix and replant in new mix.
Again this month was a varied selection of species with Pauline Myers’ Caladenia chapmanii (WA), Claire Chesson’s Thelymitra rubra, Jenny Pauley’s hybrid of Arachnorchis brumalis x conferta, David Hirst’s Caladenia discoidea and the winning entry, Rosalie Lawrence’s Diuris brevifolia.
This strikingly yellow flowered donkey orchid endemic to South Australia is listed as Endangered. Its range was once quite widespread in the southern Adelaide Mt Lofty Range region but now it is now restricted to pockets on the Fleurieu Peninsula and western Kangaroo Island in Heathy Woodland, Wetland and Riparian habitats.
There is interest today in cultivating orchids for conservation or ex situ conservation. With the reduced range of this species, can it be cultivated and thus continue to ensure its survival as a species? Some sources seem to suggest that it is an easy plant to cultivate, and some Diuris are easier than others, but Les Nesbitt points out that he has some plants from a rescue dig several years ago and that they have not multiplied very much in that time. This suggests that they may be dependent on a specific fungi. Though it has not been hugely successful in cultivation, it is worth noting that it has been used to produce hybrids with several other Diuris.
Reference
Bates, R. J. (2011) South Australia’s Native Orchids NOSSA DVD, Adelaide
Nesbitt, L personal communications
Adelaide and Mount Lofty Ranges South Australia Threatened Species Profile Fact Sheet – Diuris brevifolia